Upload to Google Play
VoltBuilder can automatically upload your app to the Google Play Store at the end of your build. Uploaded apps are eligible for test or release.
There are a few additional setup steps to do in Google Play, but they only have to be done once.
Google updates the Play Store pages frequently. Check Google’s documentation for the latest updates.
Here’s how it works.
Set up your app in the Google Play Store
- Set it up as a normal listing. You can use an existing app already in the store.
- If it’s a new app, upload it to the store manually the first time to create the package name. In Google Play Console > Production > New release. You will see where to upload the app:
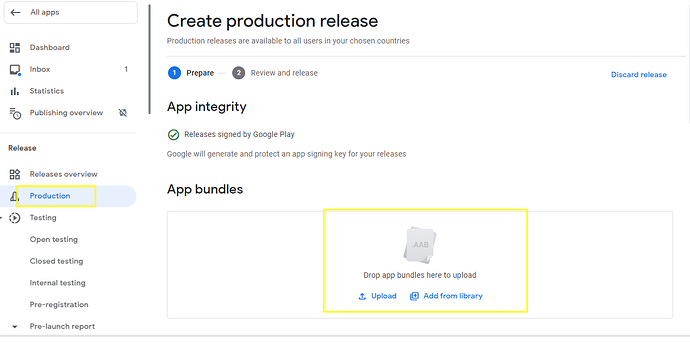
(To build without uploading, remove“googlePlayKey”and“googlePlayTrack”from voltbuilder.json, then build. You should then be able to download the.aabfile.)
Get Google API Credentials
Tip: If you see Google Play Console or Google Developer Console in your local language, add &hl=en at the end of the URL (before any #…) to switch to English.
- Open the Google Play Console, All Apps view.
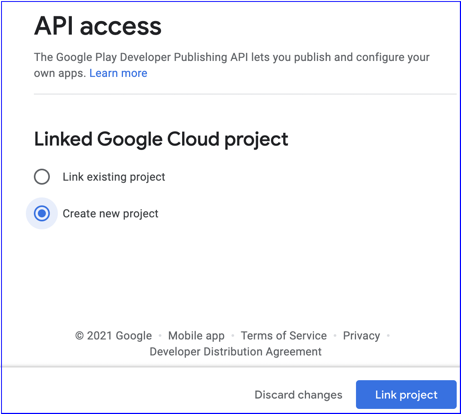
- Click the Setup menu entry, followed by API access.
- Click on Create New Project, then Google Play Android Developer.
- Agree to Terms of Service (if needed)
- Click Create new service account (It’s about halfway down the page and not highlighted). It will tell you to go to Google Cloud Platform. Go there.
- Click the CREATE SERVICE ACCOUNT button at the top of the Google Developers Console
- For Service account name, enter
VoltBuilder - For Service account description, enter
VoltBuilder API access - Click on Create and Continue
- For role, choose Service Accounts (scroll down) > Service Account User.
- Click on Continue
- Click on Done
- A table with display with your new entry. Under Actions, choose Manage keys
- A new panel will appear. Click on ADD KEY, then Create new key
- A dialog box will appear Create private key for “VoltBuilder”. Select JSON as the Key type.
- Click CREATE to close the dialog and download the file. Save it to your project’s Certificates folder.
- Make a note of the file name of the JSON file downloaded to your computer. It will be something like
api-8264238403641545035-843025-f2f055a01404.json(You can name it something else if you want: google.json is a good name.)
- Back on the Google Play Console, click DONE to close the dialog
- Click on Grant Access for the newly added service account
- You will now be on the Invite user page. Check that only the items in the Releases section are checked.
- Click on Invite user
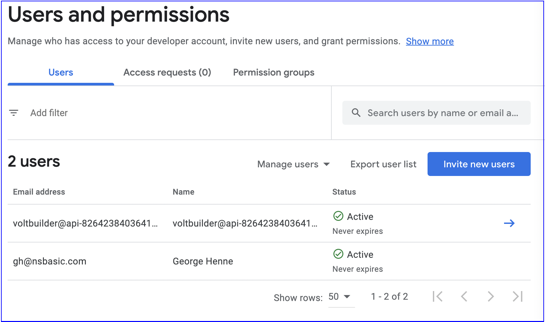
- Click on Send invite
- You should now see your new user:
Add App Permissions to the Credentials
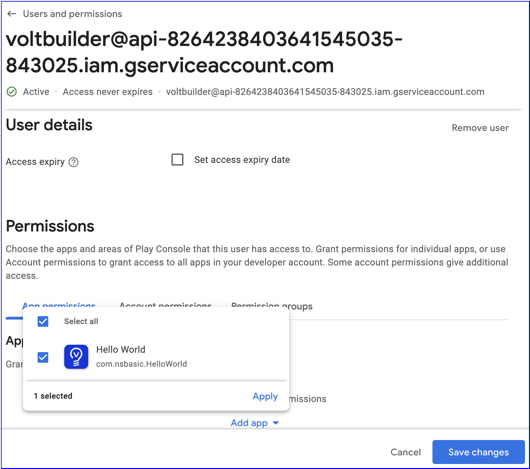
- Get to the Users and Permissions screen in the Google Play Console.
- Click on your new user (voltbuilder@…)
- App Permissions will show. Select Add app
- Select your app and Apply
- Save changes
Tell VoltBuilder about it
- VoltBuilder.json: Add these lines to your voltbuilder.json (substitute your values).
  "googlePlayKey": "certificates/google.json",
  "googlePlayTrack": "production",
Valid values for googlePlayTrack include internal, alpha, beta, and production. These correspond to Internal Test, Closed Testing, Open Testing, and Production in the Play Store. Each track can have one (or more) releases. A release is in draft mode until it’s promoted to complete by the developer. The Play Store has documentation which explains what state the Play Store needs to be in to upload to various tracks.
- Build Number: Each time you run, make sure
android-versionCodehas been incremented in config.xml.<widget android-versionCode="2" version="1.0.0" ...
Do a release build as usual. If the upload fails, VoltBuilder will return a message. Otherwise, your app will have been uploaded to the Google Play Store.
Refreshing your Credentials
If you get the message 'invalid_grant: Invalid JWT Signature.', you need to refresh your google.json file.
- Open the Google Cloud Console.
- Choose IAM & Admin.
- Click on Service Accounts.
- Click on the VoltBuilder account link.
- Click the KEYS tab.
- Click Add Key, then Create New Key.
- A dialog box will appear Create private key for “VoltBuilder”. Select JSON as the Key type.
- Click CREATE to close the dialog and download the file. Save it to your project’s Certificates folder.
- Make a note of the file name of the JSON file downloaded to your computer. It will be something like
api-8264238403641545035-843025-f2f055a01404.json(You can name it something else if you want: google.json is a good name.)